Archive for the 'Technology' Category

In honor of the Crocodile Cafe re-opening

Friday, March 27th, 2009

I know it’s sort of late (at least in Internet Time) but to celebrate the re-opening of the iconic Crocodile Cafe I give you Wolf Eyes live at The Croc in 2003.

I did not film this. Actually, this was before I even owned (or had access to) any equipment for recording shows. My friend Craig Mueller filmed this using a Canon XL-1 with a shotgun mic mounted on it. It looks great and sounds great. I guess it might look and sound awful if you’re not into noise music but maybe I kinda don’t care and you should man up and grow a pair.

Download:
SD MP4 (276 MB): we2003-03-23.mp4

Some Launchy tweaks

Thursday, November 15th, 2007

Let’s get nerdy for a second.

The one piece of software I need on my computer is Launchy. When I hit alt+space it brings up a little window from which I can launch any program in my start menu, any bookmark from my favorites (including custom search bookmarks), and even do inline numerical calculations.

Turns out, you can do even more with the clever use of batch files. I found a post on LifeHacker about using Launchy to do more. I started using the custom batch files written in this post but became annoyed with the fact that every time I launched a batch file via Launchy, I’d see a black cmd window pop up to execute the command.

So let’s do it my way.

First, install the following executables to the path C:\WINDOWS:
1) nircmd (this is for commands)
2) curl (this is for http commands)

My buddy pointed out nircmd to me and I realized that with this tool I can do virtually anything through Launchy. Not only did it allow me to successfully launch the batch files silently, but it also gave me a quicker way to shut down and log off of my computer and an easy way to manage window arrangements (minimized, cascaded, etc.). Let me show you an example of how to make nircmd, curl and Launchy work together:

Example 1: Control XBMC with Launchy

1) Make a shortcut to nircmd:

2) Put that shortcut in C:\Program Files\Launchy\Utilities. This will be your template shortcut that you’ll copy and paste as you make new nircmd commands.

3) Make a copy of the shortcut and name it “Play.lnk”

4) Make a new batch file in Launchy’s Utilities directory called “Play.bat”. The file should contain this text (Where “ip#” is the ip number of your Xbox running XBMC with the web server turned on):

@echo off
cd c:\
cmd /c curl --basic http://ip#/xbmcCmds/xbmcForm?command=play
Echo Exiting...

5) Right click Play.lnk and go to “Properties”:

The text box for “Target” should read:

C:\WINDOWS\nircmd.exe execmd "C:\Program Files\Launchy\Utilities\play.bat"

6) No repeat steps 3-5 and replace the active function for “Pause” “Previous” “Next” and “Stop” commands as necessary. Rebuild your Launchy index and you’re good to go. Now you can control your Xbox with launchy.

Example 2: Play albums with Launchy

I also incorporated Launchy into my music listening habits by forcing it to index playlist files on my Music drive. At the time I had no playlist files for any of my albums so I had my friend write a script in lua that will build them automatically (based on my file structure, of course): cobble.zip

To automatically create m3u playlists using this script:

1) Unzip all of the files to the root directory of your music directory

2) Run cobble.bat

Note:
This script will work with a directory structure that looks like: artist\[year] album\files but I’m sure you can figure out how to suit it for your needs. It automatically corrects for conventions such as “Beatles, The” in your folder names and it also makes sure to ignore any files but audio files. At the end you should have an *.m3u file that is formatted as such: The Beatles – Abbey Road.m3u.

3) Bring up Launchy and go to the “Directories” window. Add your music directory and set Launchy to only index m3u files for that directory.

4) Rebuild Launchy’s index.

Of MP3 and FLAC: A Bard’s Tale

Tuesday, June 13th, 2006

Within the taper community the mantra is Quality is king!. Tapers pride themselves on getting a quality recording and most are insulted at the thought of raping their waveform with a lossy codec like MP3, and rightly so.

See, when you encode a WAV to MP3 a lot of information is left out. MP3 leaves out everything above ~15kHz because the average person (and even most audiophiles I’d wager) can’t hear those frequencies anyway. So who cares? Well, a lot of people, and here is why.

1) Once it’s gone it’s gone.

See, when you encode a WAV to an MP3 and it loses that data, you can’t get that data back. That’s not a huge deal in regards to albums because people can always go out and buy the CD if they want to hear the original files. With live recordings however, they’re not as easy to locate and sometimes the source recording is lost forever if a taper loses his source recording or if he just disappears from the scene completely. It’s up to the members of the taping community to maintain the integrity of the recordings for everyone.

2) Once it starts, it’s hard to stop it.

Say I post a show of mine in MP3 format and a dozen people download it. Then a few of those people burn the MP3s to a CD for listening on-the-go and their friends want copies. So they take those CDs and rip them to MP3 (using only god knows with which to encode). Now you’ve got MP3 > WAV > MP3 lineage going on and it just keeps going from there. It’s a slippery slope folks.

Even bearing both of those important points in mind, I still understand why people want MP3s instead of FLAC. iPods don’t play FLAC files and most people have those, Winamp doesn’t play FLAC files out of the box and iTunes flat out refuses to play them, and the files are 4-5 times bigger than MP3s. The reasons are varied, but they’re all quite valid. Trust me, I’m on your side on most of the points.

So I’ve given it some thought and decided a compromise is in order. No, I’m not going to start hosting MP3s. That’s crazy talk. What I will do, however, is make it easy for the end-user to convert the FLACs to MP3 with a click, a wish and a prayer. Enter: FLAC2MP3.

Download: FLAC2MP3.zip

Ok so I didn’t write this script, but a buddy of mine sure did when I asked him to because he’s all kinds of crazy cool like that. Written in WSH, FLAC2MP3 will take any set of FLAC files and decompress them to WAV, then encode them to MP3 and delete the remaining WAVs. It even transfers over the metadata!

This way I still get to force the quality of lossless files on the unwashed masses and you get to listen to your filthy MP3s on your lil’ beatbox! Just make sure that when someone asks you for a copy of that smokin’ tape you give them FLACs (or at least a straight audio cd sourced from the FLACs).

A Computer In My Living Room: An Epilogue

Tuesday, April 11th, 2006

Previously, I wrote a two-part entry where I documented the hardware and software that I used to make a home theatre PC capable of playing audio through my stereo system. The system worked well enough but it only lasted for about a month before I got tired of it.

It was too cumbersome.  Running a VGA cable under the rug looked stupid as did having an LCD monitor next to the couch.  The whole thing was annoying to use as the computer was loud, the bluetooth mouse was finnicky, the monitor was crappy, and the interface was clunky.

I am no stranger to defeat in the realm of technology.  When I realized my homebrew HTPC was a dud, I took it apart and tried to think of another solution.  Pretty much all of the ideas I came up with required me to build a full computer that would cost me at least $1,000.  I didn’t want to spend $1,000.

I then decided to take a look at pre-made solutions that were more tailored to my needs.  At this point I was still mainly interested in audio players which is why the Squeezebox from Slimdevices caught my eye.  It plays most of the formats I use, has a snazzy web interface, can access a music share wirelessly and is certainly less expensive than building an entire computer just to play audio in my living room.

I’d been using the Squeezebox for the last two months or so and loving it.  Then I began jonesing for a way to play my computer-specific video files in the living room.  You know, XViD and DiVX, that sort of thing.  I started looking for a pre-made solution for video but all of the reviews I found for these types of devices were less than stellar.  They choked on codecs or were a hassle to set up or they cost too much or the remote control sucked or they didn’t do wireless or any number of things.

I couldn’t see dropping a few hundred bucks on a device that was just going to frustrate me.  With my conundrum in hand, I turned to the goons of Something Awful for advice.  A few people recommended some devices I hadn’t heard about, but then a small army of posters came to tout the wonders of a soft-modded Xbox running Xbox Media Center (XBMC).  They didn’t give reasons or pros and cons.  They just said “Get an Xbox and soft-mod it. Install XBMC. You will be pleased.”

Usually I poo-poo this sort of advice, but I decided to investigate further and I found this thread which details how to soft-mod the Xbox and I decided “Why the hell not? If nothing else, I’ll have an Xbox.”  I went to Fred Meyer and picked up an Xbox with Forza Motorsport and an Action Replay.  I went to Blockbuster and rented Mech Assault (one of three games that allows for the exploit to work).  I was on my way.

I modified the Xbox in about 15 minutes.  Most of that time was spent installing Datel’s Action Replay software (which is ugly and not very intuitive by the by).  After that it pretty much went like this:

  1. Transfer Mech Assault gamesave to the memory card.
  2. Transfer Mech Assault gamesave from the memory card to the Xbox hard drive.
  3. Load Mech Assault gamesave called “Run Linux”.
  4. Bloop Bleep Boop Beep Linux Installed have fun.

After that it was a breeze to do anything else.  I installed XBMC and set it as the default dashboard. I cloned the contents of the tiny 8GB hard drive to a spare 160GB hard drive I had lying around and installed it in the Xbox.  I set up SMB shares for XBMC to stream media over the network.  I installed emulators for NES, SNES, MAME, Genesis, and N64.  Everything “just worked”.  It was like using a Mac without paying out the ass for it.  Once I had it all set up, I began to use it.

Oh god they were right.

It plays everything.  It plays every XViD file I have, it plays every audio file I have, the emulators work perfectly, the interface is beautifully intuitive and polished… it’s everything I’ve always wanted in a home theatre computer and it only cost me 200 dollars.

Oh yeah, and it plays Xbox games.

My new hobby.

Tuesday, January 24th, 2006

I sure do like buying stuff. I don’t enjoy materialism without purpose, though. I like buying nice stuff that I can use (or that will be worth metric truckloads of money in the future) and, just recently, I did that.

See, my new hobby is recording live concerts. Like most hobbies I take up, I spent a few weeks reading hundreds of forum threads on the Internet until I had a good idea of what equipment I needed and what I could realistically afford.

For situations where I would need to record shows “on the downlow” (as the kids say) I built a “stealth rig” consisting of the following components:

1) Sound Professionals CMC-8 microphones

These mics use the Audio Technica 943 capsules and terminate with an 1/8″ stereo plugin. They’re also tiny as hell.

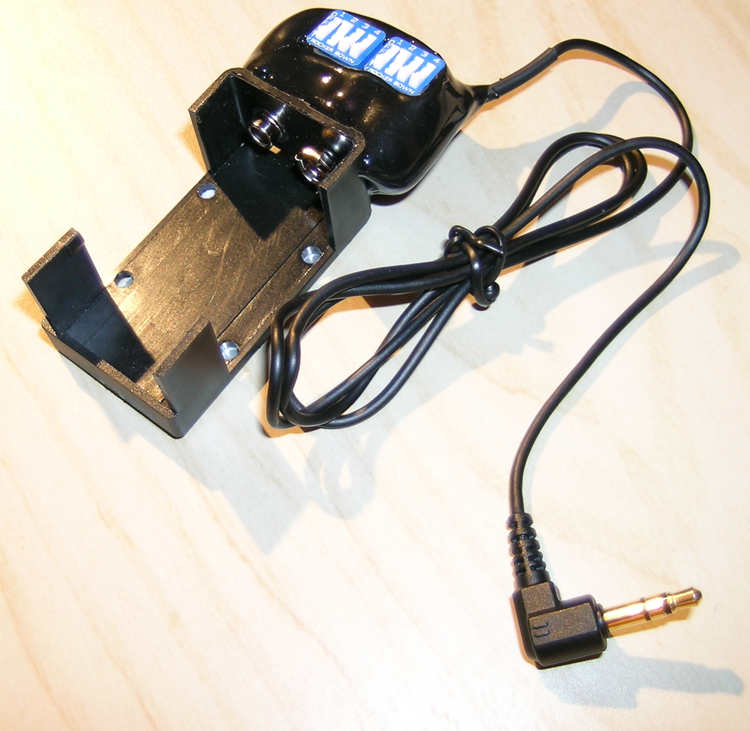
2) Sound Professionals SPSB-6 battery box

This 9v battery box powers the mics (since they can’t take be powered with 48v phantom power) and also has a bass roll-off option to cure the mics of being too boomy. I usually roll off the left and right channels at 107Hz.

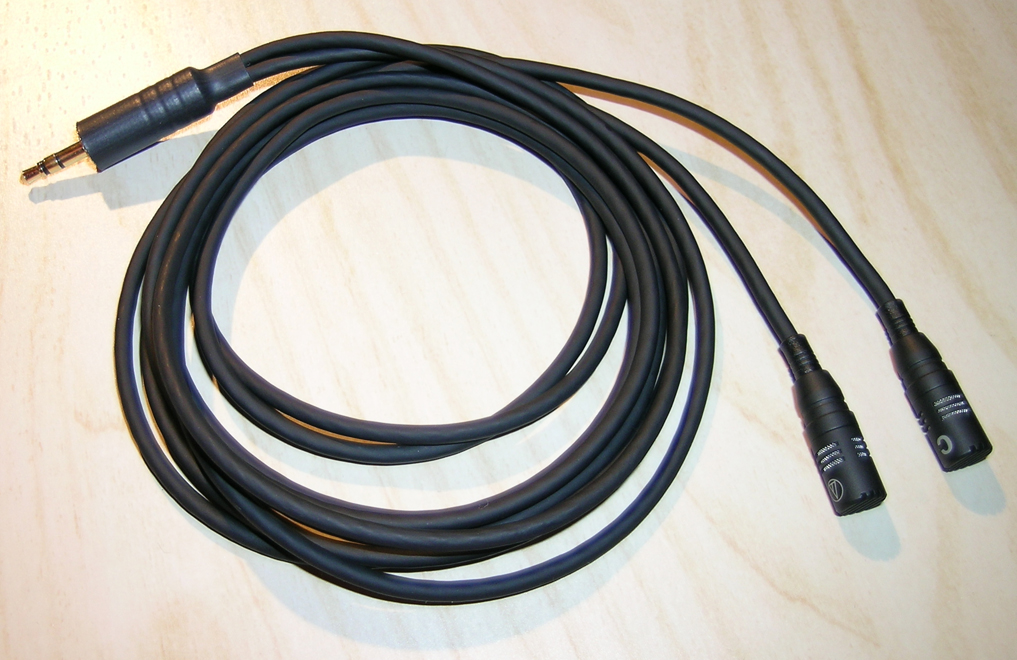
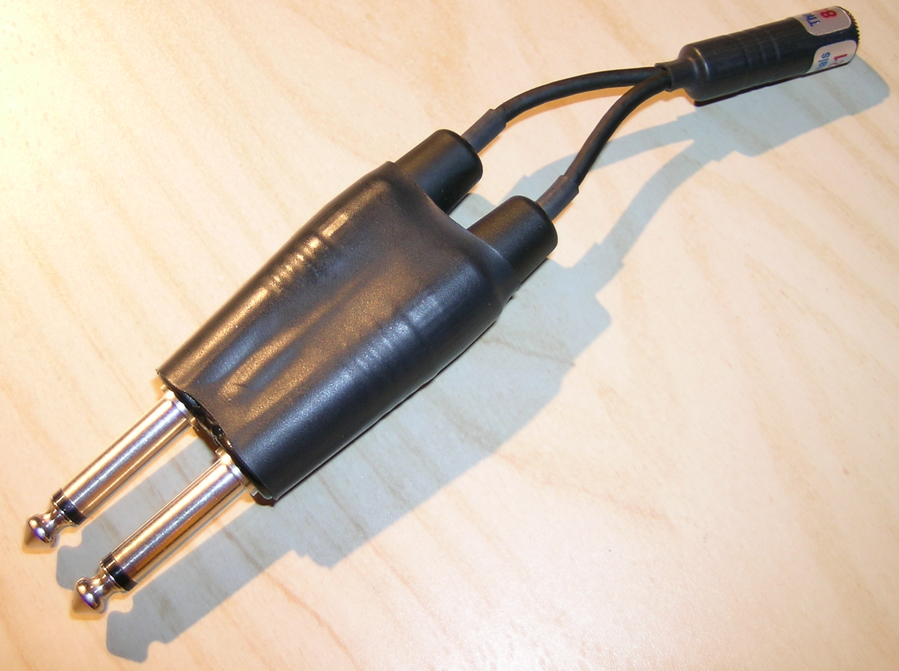
3) Sound Professionals 1/8″ to TRS dongle

This dongle converts the 1/8″ termination of the battery box into two 1/4″ TRS (tip-ring-sleeve) terminations.

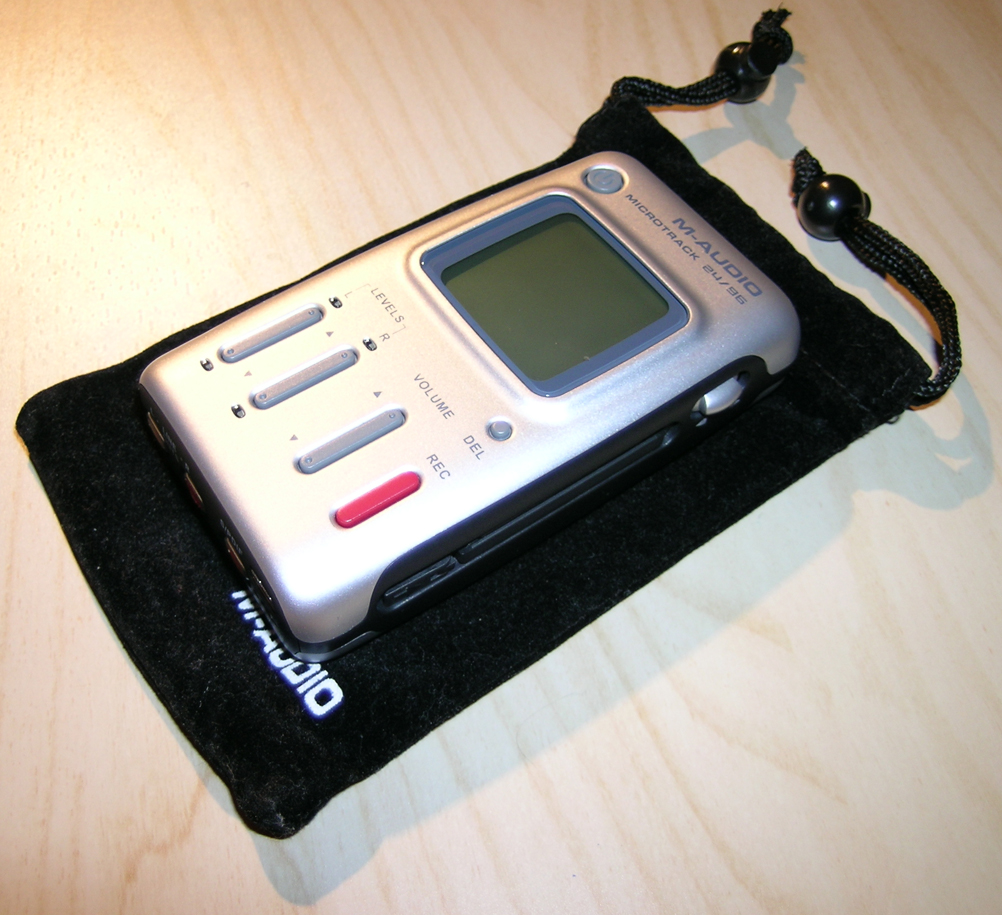
4) M-Audio Microtrack 24/96

This is the real beauty of the setup. The Microtrack takes care of the analog to digital conversion stage and records to compact flash or a microdrive (at up to 24 bit-depth and 96 kHz sample rate). It really is a versatile device as it can record through digital coax if you have an outboard A/D converter and can be powered remotely via USB if you need to record for hours at a time.

That’s my covert ops recording setup. I also dropped some cash on an “open rig” for situations where both the venue and the band are cool with people recording the show. With an open setup you can add more pieces of equipment to the rig without having to hide it in your pants and, hopefully, end up with a better sounding recording than if you were recording on the sly. Here is what I’m curently using for open-tape situations:

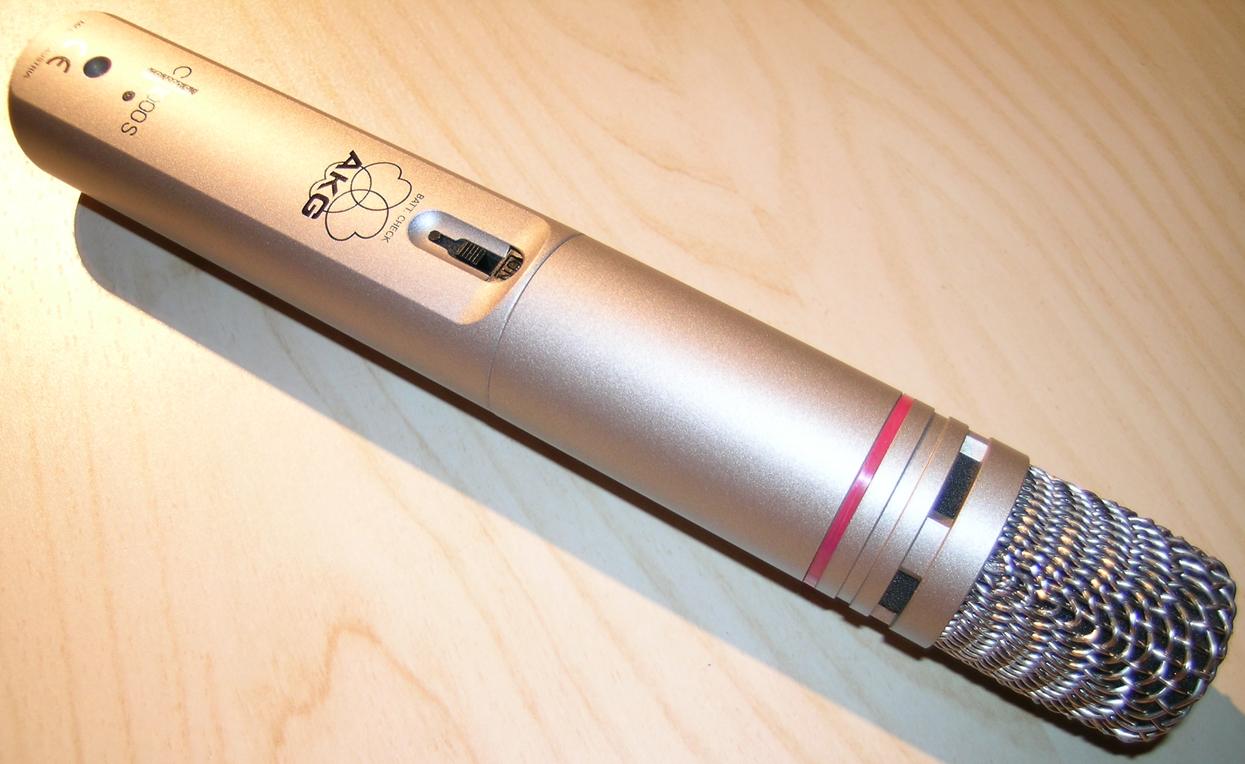
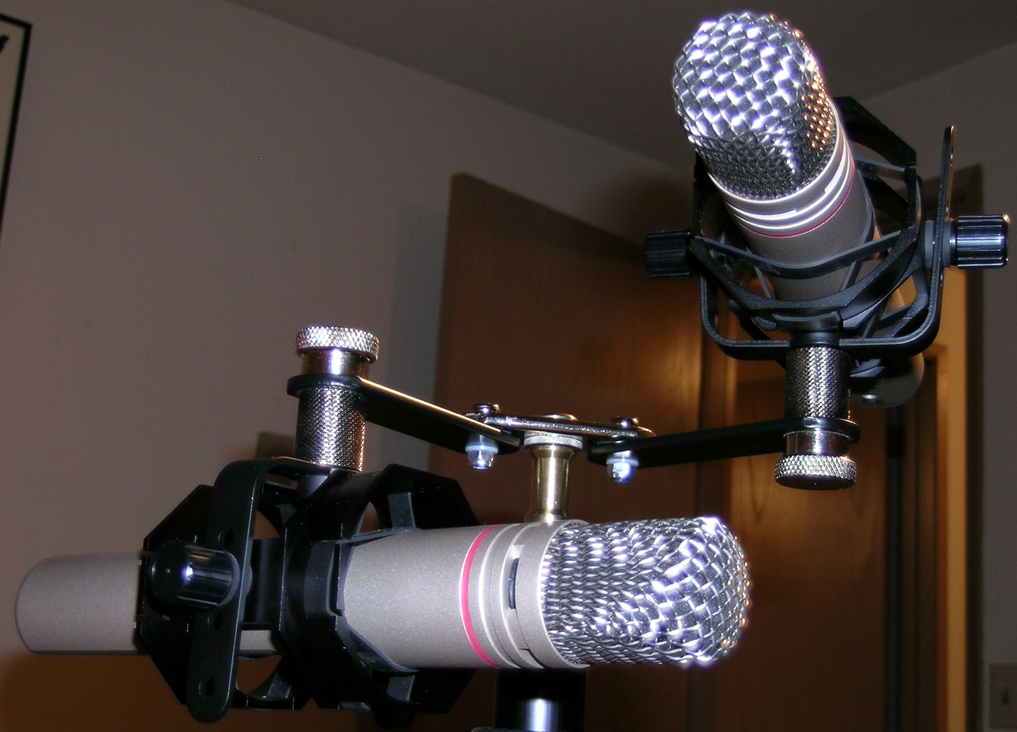
1) AKG C1000S microphones

These are very much the “newbie taper” microphones, but for the price they get the job done very well. I recorded a friend’s band with them a few weeks ago and was amazed at the clarity they provided.

Each microphone is mounted in an Audio Technia 8415 shock mount which suspends the mic in an elastic cradle in case the mic stand is bumped during recording.

For various microphone configurations (which, as I’ve come to find out, there are an abundance of) I bought an AKG stereo bar which will easily allow me to set up the mics in HRTF, X/Y, DIN, AB, etc etc. The stereo bar mounts on a 10′ air cushioned light stand I bought at Glazer’s. See my lack of mic config know-how here.

2) Edirol UA-5

This device handles the mic power, gain, and A/D conversion stage. It provides the microphones with 48v of phantom power and allows for individual control of left and right gain. It outputs analog via RCA or digitally via digital coax or optical.

I bought a modified version of this unit from the TapersSection.com used equipment forum. It was modified by Doug Oade to have a transparent gain stage and a lower noise floor. It also has the Oade Plus Mod which alters the power supply and analog stage of the unit to increase detail and decrease noise.

To power this unit in the field, I went to RadioShack (which is lovingly referred to as “Rat Shack” in the taping community. It’s like the Micro$hit of the taper world.) and bought a li-ion battery and some of their Adaptaplugs (B plug for the battery end, M plug for the UA-5 end).

3) M-Audio Microtrack 24/96

Once again, running into the Microtrack but insead of using the TRS inputs I can use the S/PDIF digital coax input (running digital out from the UA-5).

I’m powering the Microtrack using the same model battery that powers the UA-5, but I had to get a voltage regulator to feed the unit 5v intsead of 9v. A member of TapersSection.com makes such a unit he calls The Juicebox. I got a used Juicebox from a TS.com member and it works just great.

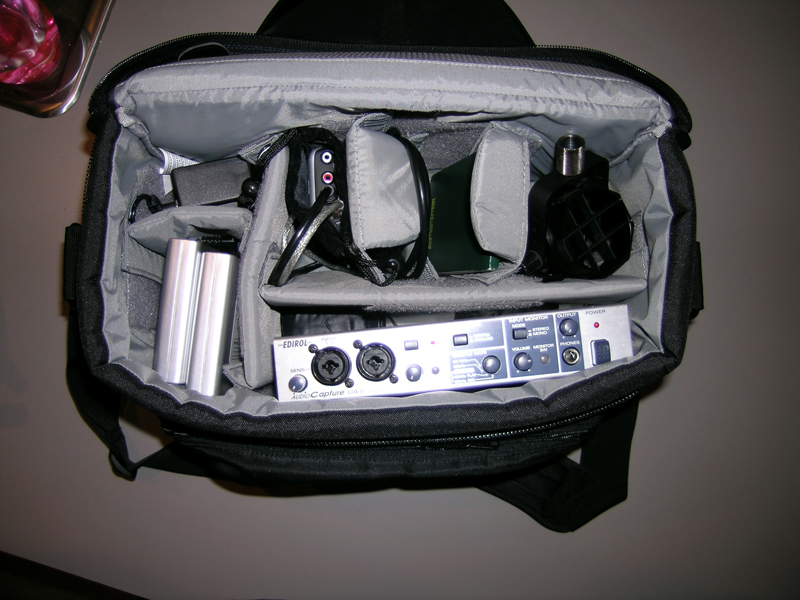
For all of this gear, I have a a Lowe Pro Nova 5 camera bag. I still don’t have a solution for storing the microphones, though. The C1000S is a lot bigger than most field mics so it’s hard to find something to store them in that is low-profile. Here is my bag all packed up (sans the XLR cables).