

How to map out your entire city
April 8th, 2005Google Maps’ new satellite view is causing quite a stir on the ‘net as of late. People haven’t had this much fun getting directions from Point A to Point B since Mapquest first came out.
Now I’ll show you a quick and dirty way to make a huge map of your entire city using the following tools:
1) Google Maps
2) The Print Screen key
3) Adobe Photoshop
If you don’t have Photoshop, I’m sure other image editing applications will work. I simply chose Photoshop because I’m familiar with it. Ok, so let’s get down to business.
First, find your city on Google Maps. I just typed in my home address and it brought me straight to it. Next, switch to satellite view so you can get a lay of the land and zoom in as far as you can. Now you’re ready to make a huge map of your city.
Make sure the window is maximized so you get the biggest map area possible in each screenshot. Then, hold ALT and Print Screen (OPTION SHIFT 4 on a Macintosh). This will take a screenshot of the currently focused window and put that screenshot in your clipboard. Now go over to Photoshop and hit CTRL N to make a new canvas. You’ll notice that the canvas size is the same size of your browser’s window. Photoshop is smart like that.
In your new canvas, hit CTRL V to paste in your screenshot. This canvas is going to be our toolbox for getting our map on its feet. Go to the selection tool in Photoshop (keyboard shortcut M) and zoom in on the screenshot a little bit so you can be precise (keyboard shortcut CTRL +). Now, click select the entire map area, excluding the 1px light grey border and the controls.
Now you have your base selection that you will use again and again as you make your map. In order to re-use this selection again and again, we’ll need to save it. Go to Photoshop’s menu at the top and click “Select” then “Save Selection”. Leave all of the settings as they are, but name your selection something you’ll remember. I chose to name mine “map”.
Ok, so now that your map selection is done, go ahead and copy it (keyboard shortcut CTRL C) and make a new canvas. Paste the new selection into your canvas and you’ve just made your first part of larger things to come. This canvas is far too small for an entire city to fit, so we’ll need to resize the canvas. Go to Photoshop’s menu again and click “Image” then “Canvas Size”. Resize your canvas 300 percent in both width and height and anchor your existing piece to the top of the canvas (or to the bottom if you plan on making a map to the North). Ah, that’s better. A ton of space to work with.
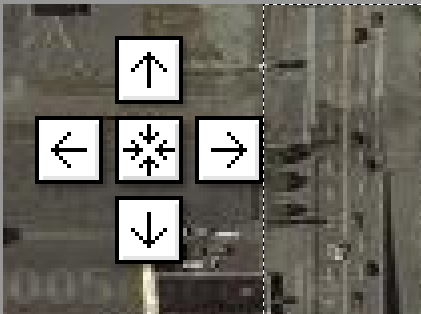
Now go back to your browser, advance the map in any direction, and screenshot (ALT PRINT SCREEN) a new piece of the map. Google Maps’ advance buttons don’t move one full frame per step, so you will have overlapping sections (and that’s ok). Just know that when you advance to the right one step and take a screenshot, you will be saving redundant map areas.
Remember the original canvas we made in Photoshop with our first screenshot? Go back to that canvas and paste in your new screenshot. You’ll notice that when you paste in the screenshot, it will have removed your previous selection, but that’s why we saved it in the first place. Go to Photoshop’s menu and click “Select” and then “Load Selection”. Click the “Channel” drop down menu and find your selection that you made. Voila, it’s back! Now you can simply copy the selection and paste it into your other canvas (the huge one, remember?).
Now the tricky part to adding new sections to your map is lining them up exactly. Since you’re probably looking at city streets, lining those up is pretty simple (except in Seattle where I live… the streets curve all the time for no reason). Try to line up landmarks that you will recognize and the map will come together in a snap.
Just keep repeating the process:
1) Advance the map in the desired direction.
2) Take a screenshot of the window (ALT PRINT SCREEN).
3) Paste the screenshot into your first canvas.
4) Load your selection and copy it.
5) Paste your selection into the second canvas and line it up.
It’s pretty easy once you get the hang of it. Also, if you want to put in little markers for certain addresses, just do another search for that address and take a screenshot of the map like you would for any other map section. Then you can paste that map area into your canvas and have a marker for that address.
Finally, here is my example map that I did of the area around Seattle University.
Update: I got really bored. Here is pretty much all of Seattle (from Ballard down to Safeco Field, from Downtown up to Montlake) in one huge 40 mb jpg. See if you can spot the marker I put in for my house: seattle_full.jpg
July 18th, 2019 at 7:15 PM
Hiya very cool web site!! Man .. Excellent .. Wonderful ..
I’ll bookmark your web site and take the feeds additionally?
I am satisfied to search out numerous helpful info right here within the publish,
we want develop extra strategies in this regard, thank you for sharing.
. . . . .